Life Lessons learnt in support

On 1 December 2012, I started working full time as a support ninja at WooThemes.

Besides motoring away everyday at making clients happy, I have also been monitoring my progress along the way. Now by monitoring I mean physically counting the tickets and doing analytics and basic reflection. During  this time  I have found out that there are some valuable life lessons and disciplines that I got from simply doing support from day to day.

I’m continually learning, but I’ll be happy to share my lessons with you:

Continue reading “Life Lessons learnt in support”

Remove Disqus comments from WordPress pages

You have just installed the Disqus comment system on your WordPress blog and now you see it appearing all over the show, on both pages and posts alike. I ran into the same issue and for obvious reasons only wanted to show it on single blog posts and would love to share how I fixed this with you.

There are only two simple steps so be sure to do exactly as I explain.

Step 1

Disqus is added to your posts and page alike through the WorPress ‘comments_template’ filter. In order to override this we  will have to disable this filter from being called by the plugin. To do this add the following code to your theme’s functions.php:

https://gist.github.com/6607344.git

This will only disable Disqus, but will still show the default comment system, which we’ll remove in the next step.

Step 2

The final step will simply be to remove the default comment system from pages as well. To save you some time there is already a plugin that does this: http://wordpress.org/plugins/disable-comments/

After installing and activating this plugin. Go over to the settings and make sure you select by post type option ensure that only blog posts are unchecked ( meaning comments will be hidden for the checked post types).


Git vimdiff Mergetool Cheat sheet

Your project is progressing at an amazing pace. You’re committing regularly, getting close to the release date when you suddenly hit a merge conflict! What do you do now?

You see something like : file.extension : needs merge. Frantically, you google and, see that opening the merge tool will help and now you’re dumbstruck. I’ll help you along here.

Vim Diff shows you 4 windows.

The first thing you should note about the four windows is that you can have the cursor in any one of the four and work from there. To move the cursor around you press:

'CTRL + W'  ' CTRL + W'    (notice that you should press it twice)

Now Let me explain each of the windows. ( not in order).

(1) The target branch, which is the one you’re on now. This is where you would like to merge the other branch into, but this window is only used as a reference to see what the current branch looks like.

(3) The remote/merge branch which is the branch that you would like to merge into the local/target branch above (1).

(2) The most common ancestor of the target (1) and the merge(3) branch.

(4) The final branch into which you would like to merge the target and the merge branch. This a generated file into which the most common items are merged. This is where you need to pull items from target (1) and merge (3) into, to give you the final file.

The second thing you would like to do is move from one conflict area to the next.

]c  (right square bracket ‘c’) move you to the next conflicting text

:ls identify the windows (names and numbers) This is important so you can combine it with diffput and diffget commands below.

`[c`   (left square bracket ‘c’) moves you to the previous conflicting text.

:diffget  *     diff get takes a change and brings it into the current working window. You need to use this with the identity that you find when  running :ls . You can also use ‘do’ as a shortened version (without the colon)

:diffput modify another buffer from the current focus area.

These are all of the operations you’ll need to move changes from merge( window 3) and target ( window 2) into the final file.

I’ll add more and change this cheat sheet as I discover this tool.

Generate a link list of all Zendesk articles in a specific forum

I needed to print out a list of links for all articles in a specific forum, for use in our Project management system. I had to go through all the items to ensure that they are compatible with the latest version of our Canvas Theme.

I’ve used chrome for this and suggest you do the same as I don’t know how to replicate this other browsers.

1) Navigate to the specific forum on the Zendesk agent panel. In this case canvas.

link lists for a specific zendesk forum

2) Scroll down to the bottom of the page and click more until all the items are displayed on the page:

zendesk_forum_link_lists_click_more

3) Then Open the chrome developers console and click on console:

zendesk_forum_link_lists developer_console

4) Past the code below inside the console and press enter ( be sure to change line:4  from  support.woothemes.com support your own domain):

var count = 0;
jQuery("#content_entries .frame .item").each(function(index){
count++;
console.log("http://support.woothemes.com"+jQuery(".item-info h1 span a", this).attr("href") );
});
console.log(count);

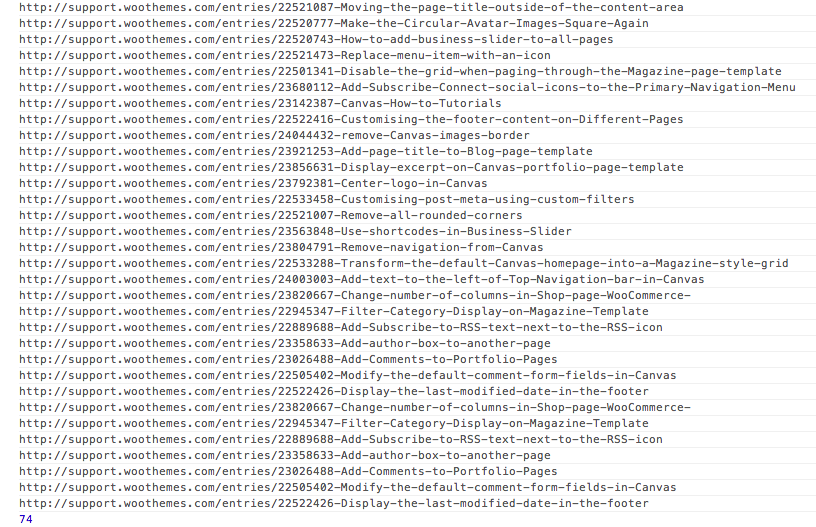
5) You will now see a nice list of  items which you can copy as a todo list on your project management software. Trello allows you to paste this whole list and creates individual to do list items .

zendesk_forum_link_lists_nice_LIST