The problem is that you’re expecting files from the Container to be mounted on your host.
Answer from: https://stackoverflow.com/questions/42395748/docker-compose-volume-is-empty-even-from-initialize
This is not the way it works: it’s the other way around:
Docker mounts your host folder in the container folder you specify. If you go inside the container, you will see that where there were supposed to be the init files, there will be nothing (or whatever was in your host folder(s)), and you can write a file in the folder and it will show up on your host.
Tag: docker
Local Development: Secure Docker Sites.

This article targets Debian docker containers running on MacOS.
HTTP (hypertext transfer protocol) is a set of rules by which your browser retrieves web pages from the internet. HTTP is the same as HTTPS whit the difference being it retrieves pages from the internet in a secure way through a private communication channel.
In our modern age, most sites have this on by default.
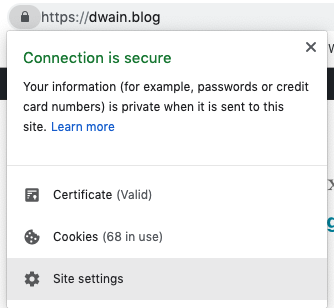
When we are developing sites, specifically eCommerce sites, we assume that this would be turned on in the production environment. This post is an attempt to get your development environment even closer to production.
Step 1 – Generate Certificates
For your browser to recognize a site as trusted and secure, it needs to validate the site’s SSL certificate. We will start by creating certs locally. To do this, you need to have OpenSSL installed.
To confirm, type this into your terminal:
openssl version
You should get the currently installed version as a reply. If not in you will first need to install it. See google for further instructions on this.
Next, change to the root directory of your project, where your docker-compose.yml is. There enter:
openssl genrsa -des3 -out rootCA.key 2048.
You will be prompted for a password, make sure you remember what he is to avoid recreation. This rootCA.key file will be used to create a new root SSL certificate.
To create a new root SSL certificate, valid for 1024 days, type the following command into the terminal. Feel free to change the number of days.
openssl req -x509 -new -nodes -key rootCA.key -sha256 -days 1024 -out rootCA.pem
You will be prompted for the password that you set earlier and then some details about your address. Make sure you fill in the qualified hostname as the domain you’re using for testing.
To confirm that all is in order type: ls | grep root. You should now see two files:
rootCA.key
rootCA.pem
Step 2 – Trust the Certificates Root
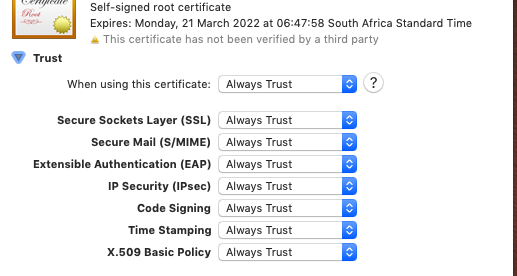
The files you’ve just created are certificate generator. Before we can trust the certificates we need to trust the generators. For us to trust the certificates generated by these files, we need to tell MacOS to trust the root files.
To trust the root files, open Keychain Access on your Mac. Press CMD+SPACE and type Keychain Access to open the program that allows you to manage your certificates. Click on the Certificates category in the bottom left sidebar. Now, import the rootCA.pem using `File > Import Items` from the top MacOS menu bar.
After the import, double click the imported certificate and under the “When using this certificate:” dropdown select “Always Trust”.
Step 3 – Generate Server Files
Create a file named server.csr.cnf. Edit this file and add the following content to it, be sure to change your domain name. This will help you avoid entering all the details manually:
[req]
default_bits = 2048
prompt = no
default_md = sha256
distinguished_name = dn

[dn]
C=US
ST=RandomState
L=RandomCity
O=RandomOrganization
OU=RandomOrganizationUnit
emailAddress=hello@example.com
CN = localhost
Next, create a v3.ext file with the following content, in order to create a X509 v3 certificate. Notice how we’re specifying subjectAltName here. Also, make sure to change your domain name accordingly.
authorityKeyIdentifier=keyid,issuer
basicConstraints=CA:FALSE
keyUsage = digitalSignature, nonRepudiation, keyEncipherment, dataEncipherment
subjectAltName = @alt_names

[alt_names]
DNS.1 = localhost
Next, create a certificate signing request and sever key file for your domain using the configuration settings stored in server.csr.cnf. The command below will output server.csr and server.key:
openssl req -new -sha256 -nodes -out server.csr -newkey rsa:2048 -keyout server.key -config <( cat server.csr.cnf )Next, create the certificate file called server.crt. The .key and .crt files will both be used by the server. server.key is the private part. sever.crt will be shared with browsers and other clients. Remember the password from step one:
openssl x509 -req -in server.csr -CA rootCA.pem -CAkey rootCA.key -CAcreateserial -out server.crt -days 500 -sha256 -extfile v3.ext

openssl x509 -req -in server.csr -CA rootCA.pem -CAkey rootCA.key -CAcreateserial -out server.pem -days 500 -sha256 -extfile v3.ext
Step 4 – Add to your server
Apache
Apache comes with default SSL certificates. The aim is to find out where they are and replace them with your newly created files. We are not going to update configs as this is more complicated.
SSH into the machine. For me the command to do so is. You can find the image name where your server runs in the docker-compose.yml file
docker-compose exec --user root php bashNext, there should be a list of sites enabled by default. Let’s look at the contents of the SSL specific config:
cat /etc/apache2/sites-enabled/default-ssl.conf

<IfModule mod_ssl.c>
	<VirtualHost _default_:443>
		ServerAdmin webmaster@localhost
		DocumentRoot /var/www/html
		ErrorLog ${APACHE_LOG_DIR}/error.log
		CustomLog ${APACHE_LOG_DIR}/access.log combined
		SSLEngine on
		SSLCertificateFile	/etc/ssl/certs/ssl-cert-snakeoil.pem
		SSLCertificateKeyFile /etc/ssl/private/ssl-cert-snakeoil.key
		<FilesMatch ".(cgi|shtml|phtml|php)$">
				SSLOptions +StdEnvVars
		</FilesMatch>
		<Directory /usr/lib/cgi-bin>
				SSLOptions +StdEnvVars
		</Directory>
	</VirtualHost>
</IfModule>
We are interested in these two files. They may be called differently on your system.
- –
SSLCertificateFile /etc/ssl/certs/ssl-cert-snakeoil.pem SSLCertificateKeyFile /etc/ssl/private/ssl-cert-snakeoil.key
Now we must figure out how to get our files in these directories. If your docker container is mapped to your local file system you can simply navigate to these and copy them over and then renaming your files to match these names( overwriting theses files)
Lastly, after overwriting these files with your own you can restart apache and then load up your sit at it’s HTTP address.
/etc/init.d/apache2 restart If you’re still not getting this to work, try this post: https://www.linode.com/docs/security/ssl/ssl-apache2-debian-ubuntu/
Nginx
For Nginx let us find out which config file is used:
docker container exec <containern> nginx -tIf you are able to ssh into the container run: nginx -t.
Now let’s view the contents of the config file:
docker container exec woocommerce2test_nginx_1 cat /etc/nginx/nginx.confuser nginx;
worker_processes 1;
error_log /var/log/nginx/error.log warn;
pid /var/run/nginx.pid;
events {
worker_connections 1024;
}
http {
include /etc/nginx/mime.types;
default_type application/octet-stream;
log_format main '$remote_addr - $remote_user [$time_local] "$request" '
'$status $body_bytes_sent "$http_referer" '
'"$http_user_agent" "$http_x_forwarded_for"';
access_log /var/log/nginx/access.log main;
sendfile on;
#tcp_nopush on;
keepalive_timeout 65;
#gzip on;
include /etc/nginx/conf.d/*.conf;
}We are after the following lines:
ssl_certificate
ssl_certificate_key
In the conf file above you will see that there are no ssl_certificates, but towards the bottom of the output, you will see include /etc/nginx/conf.d/*.conf;. Looking inside this directory we will see: /etc/nginx/conf.d/default.conf;
Now looking at the output of default you will see the location of the default SSL certificates.
ssl_certificate /etc/nginx/certs/localhost.crt;
ssl_certificate_key /etc/nginx/certs/localhost.key;
Now you need to figure out a way to get your certs into that directory. In my case, this was mapped already but you can also manually map it by adding these locations to your docker-compose.yml file.
After adding and renaming your files to match the names above you can reload Nginx with this command:
docker container exec <container> nginx -s reloadIn closing
I wrote it mainly for my future self, but I hope you benefit from it as well. Please leave comments if I’ve missed a step or if anything is unclear.
References
- Step 1 and 2 and part of 3 was from an article on Freecodecamp, which is no longer available due to their politics with Medium. I have a google cache in pdf form if your interested: link to pdf.
- Step 4 apache – https://helpdesk.ssls.com/hc/en-us/articles/203482651-How-to-install-an-SSL-certificate-on-Apache
- Step 4 Nginx – https://www.shellhacks.com/docker-reload-nginx-inside-container/ )
WP Docker Curl Error
If you are using Docker for WordPress development you may have discovered an issue while trying to connect to your installation from the CLI.
Trying to do any internal API calls normally result in a curl call. In my case I had this annoying error:
cURL error 7: Failed to connect to local.test port 80 Connection refused
